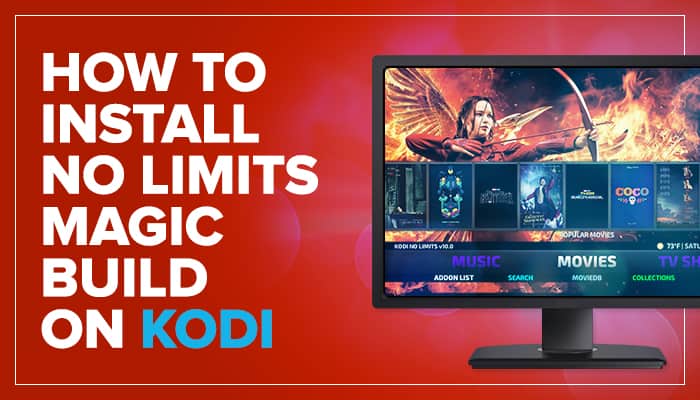
Kodi No Limits has been popular in the past year. It is the Kodi build that has already all the good add-ons installed even if you have not yet put any addon before. This means that this Kodi build is the type of build that would suit best for beginners.
The Kodi No Limits has been to several hosts before. But when it finally picked up popularity, it became slow and sometimes unreliable on downloads. This became an issue for a lot of users. But fortunately, the No Limits Wizard finally came to the picture and made KodiNoLimits even better.
As a matter of fact, the KodiNoLimits is now topping the most downloaded build on any Kodi repository. And with this, The KodiNoLimits is a must-have for all Kodi users all around the world.
Due to some changes in Kodi No Limits, some upgrades, and bug fixes, the installation has become a bit different. So this article will be the one to tell you how to install KodiNoLimits on your device.
Contents
How to Install Kodi No Limits
This method will be applicable to all Kodi versions and devices. But before you do the transition or change of your Kodi’s current build, make sure to set your Kodi settings to default. This will make the upgrade seamless, and less to no issues will occur.
Now, if you are eager to get the KodiNoLimits build, I suppose we have to start now. Here’s the tutorial on how to install KodiNoLimits on your device.
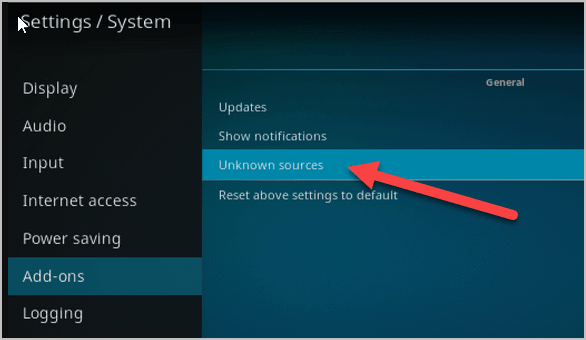
- If you have reset your Kodi settings to default, you will need to check and make sure that the “Unknown Sources” feature is enabled. If you do not know where it is, here’s how to get there: Settings > System Settings > Add-ons > Unknown Sources
- Now that you have enabled the Unknown Sources, you will be able to install any addon on your Kodi system.
- Go back to the main home screen and click on the gear icon or the System Settings.
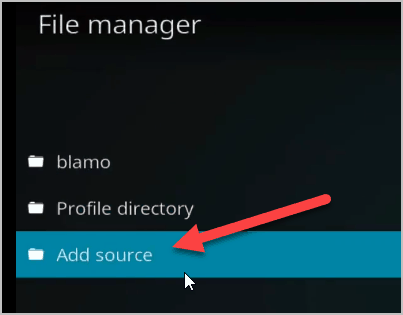
- On the next page, go to the “File Manager” button.

- Then scroll down and open the “Add Source” tab.
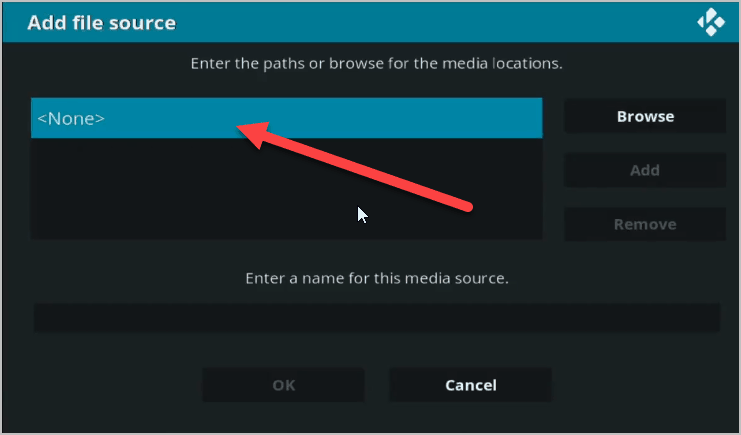
- On the “Add File Source” window, click on the “None” to launch the address bar.
- On the address bar, type in the https://nolimitsbuilds.com/kodi/ and press OK.
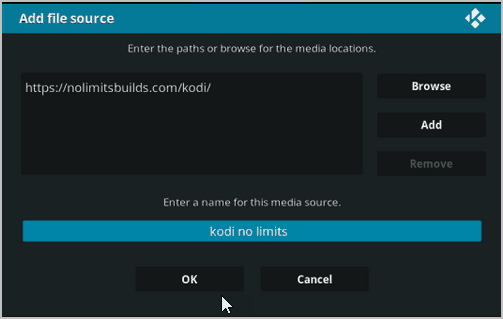
- Under the “Enter a name for this media source” type in your preferred name. In this operation, we will just call it “Kodi No Limits.”
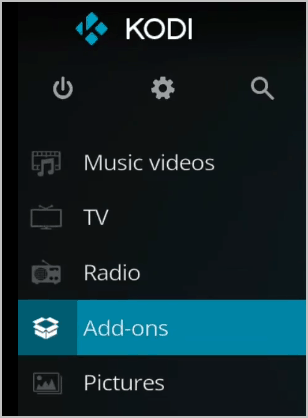
- Now go back to the main screen and scroll down to find the “Add-ons” tab.
- Once inside the “Add-ons” tab, click on the box button on the top-left corner of the screen.
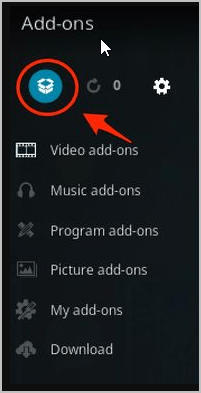
- Click on the “Install from Zip file” button.
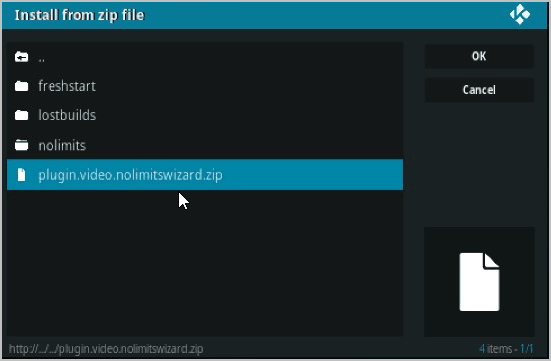
- On the pop-up window, you should find the source name that we just created earlier, the “Kodi No Limits.” Click on it to find the “plugin.video.nolimitswizard.zip.”
- This will now install the package for the No Limits build.
- Wait for a few seconds or minutes depending on the speed of your internet.
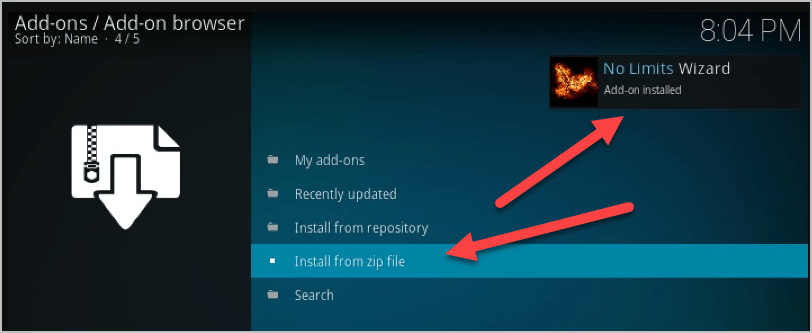
- Once you see the notification “No Limits Wizard Addons Installed,” you now have the Kodi No Limits build installer on your system.
- Now go back to the Kodi home screen and scroll down again to the “Add-ons.”
- Click on the “Program Add-ons” button.
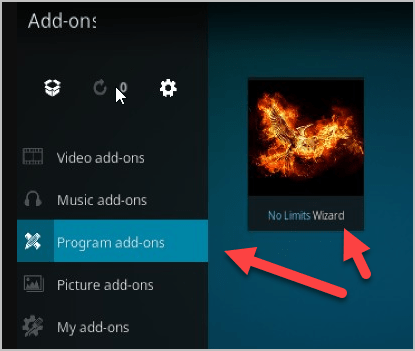
- You should see the “No Limits Wizard” icon in there. Click on it.
- You will now see the list of servers that you can use to deliver all your favorite shows. Choose the “No Limits Magic (No XXX Section)” tab for devices with 2GB Ram and more. It does not matter which server number you choose. What’s important is you choose which one is appropriate for your device.
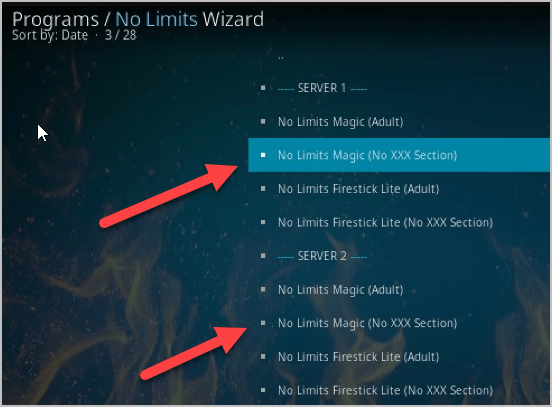
- If you are using Amazon Firestick device, choose the “No Limits Firestick lite.”
- It will then start to download the whole package for your chosen build. Wait for it to finish.
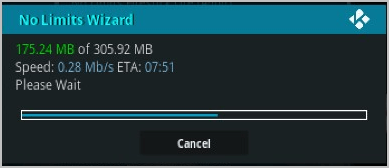
- The whole process will be automatic, so there is no need for you to do anything. What you can do is wait until the download and installation finishes.
- In the end, it should ask “Force Close Kodi,” just confirm. If it does not ask it, do it manually by going to App Manager and force close it yourself. Or you can just shut down your device and restart.
- Then launch the Kodi. This time you will see that it becomes a different Kodi and you should see the KodiNoLimits name on top.
- That’s it. You now have the KodiNoLimits build with pre-installed top addons. With this, you probably do not need to install more add-on for the next days or months. Or perhaps ever.
You can also have Kodi on Samsung Smart TV, Chromecast, or Roku. Explore Kodivedia to know how to install the app on these devices.
Kodi No Limits: Use VPN for Kodi
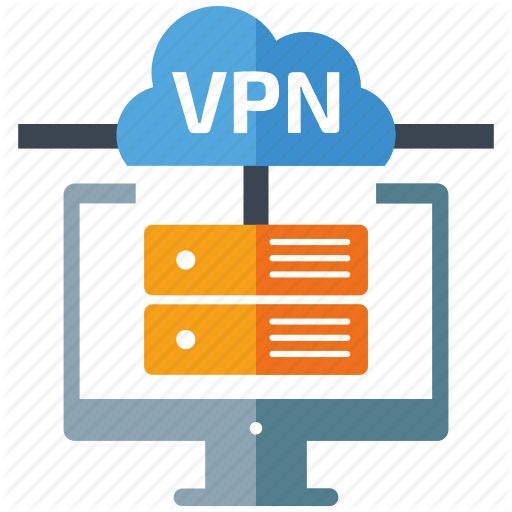
This might be a repeated reminder for quite some time, but you all should understand that privacy and security matters when you go online. This is why we encourage everybody to use a VPN for Kodi. Whether you are watching just some clips on a TV set, watching live TV shows, documentaries, movies, and sports channels, using Kodi, it is important that you are currently using a VPN.
There are countries that do not have a restriction on their internet, but there are too many countries that implement laws for these kinds of activities. And so the VPN will be a great help for you. Besides, the VPN is always the best shield against hackers and bad internet entities.
Check out for Exodus Kodi, Covenant Kodi, and Fusion Kodi. You can also find these on Kodivedia
FAQ
Yes, but if you encounter some problems with No Limits Magic Build and it is not working or streaming, force close Kodi. Then, restart your device and try again. If this still doesn’t work, try a fresh installation.
Yes, KodiNoLimits is safe to use. It is the third-party add-ons that you must be careful with when using Kodi.
-If you have reset your Kodi settings to default, you will need to check and make sure that the “Unknown Sources” feature is enabled. If you do not know where it is, here’s how to get there: Settings > System Settings > Add-ons > Unknown Sources
-Now that you have enabled the Unknown Sources, you will be able to install any addon on your Kodi system.
-Go back to the main home screen and click on the gear icon or the System Settings.
-On the next page, go to the “File Manager” button.
-Then scroll down and open the “Add Source” tab.
-On the “Add File Source” window, click on the “None” to launch the address bar.
-On the address bar, type in the https://nolimitsbuilds.com/kodi/ and press OK.
-Under the “Enter a name for this media source” type in your preferred name. In this operation, we will just call it “Kodi No Limits.”
-Now go back to the main screen and scroll down to find the “Add-ons” tab.
-Once inside the “Add-ons” tab, click on the box button on the top-left corner of the screen.
-Click on the “Install from Zip file” button.
-On the pop-up window, you should find the source name that we just created earlier, the “Kodi No Limits.” Click on it to find the “plugin.video.nolimitswizard.zip.”
-This will now install the package for the No Limits build.
-Wait for a few seconds or minutes depending on the speed of your internet.
-Once you see the notification “No Limits Wizard Addons Installed,” you now have the KodiNoLimits build installer on your system.
-Now go back to the Kodi home screen and scroll down again to the “Add-ons.”
-The click on the “Program Add-ons” button.
-You should see the “No Limits Wizard” icon in there. Click on it.
-You will now see the list of servers that you can use to deliver all your favorite shows. Choose the “No Limits Magic (No XXX Section)” tab for devices with 2GB Ram and more. It does not matter which server number you choose. What’s important is you choose which one is appropriate for your device.
-If you are using Amazon Firestick device, choose the “No Limits Firestick lite.”
-It will then start to download the whole package for your chosen build. Wait for it to finish.
-The whole process will be automatic, so there is no need for you to do anything. What you can do is wait until the download and installation finishes.
-In the end, it should ask “Force Close Kodi,” just confirm. If it does not ask it, do it manually by going to App Manager and force close it yourself. Or you can just shut down your device and restart.
-Then launch the Kodi. This time you will see that it becomes a different Kodi and you should see the KodiNoLimits name on top.
-That’s it. You now have the KodiNoLimits build with pre-installed top addons. With this, you probably do not need to install more add-on for the next days or months. Or perhaps ever.
In Conclusion
The Kodi No Limits is undoubtedly the most popular Kodi build to date. And if you do not agree with that statement, tell that to millions of users that installed it on their system. But still, being the best is pretty much objective. So in the end, the quality of the software, or in this case, Kodi, will depend on the user experience.
So in today’s topic, which Kodi build is the best one out there including this KodiNoLimits. Tell s your opinion. We will be on the lookout for a great recommendation.
If you have any questions that you think would be very helpful for others or there are just some things that we left unclear, feel free to leave your messages in the comment section below. We will try to answer all of them as soon as we can.
why does my FAST FORWARD OPTIONS NOT WORK? I am usimg the no limits magic build, 17.6, v11.9 and recently noticed the fast forward option do not work is there a FIX for this? please advise asap. thank you, JJ